Appointment Arrival Options for Patient Portal and Clinipad

When patients are checked in, EXACT will display an appointment arrival prompt to inform the receptionist of the forms and information they need to collect from the patient before they reach the chair.
The forms available for patients to complete prior to their appointment on both Clinipad and Patient Portal can be configured in EXACT. It is possible to enable, disable and edit some of the forms, the options are listed under each heading including how to enable/disable or edit each option.
Access the arrival options via Configure - Appointment Book - Arrival Options.
This window will display all the available forms for your region (not all forms mentioned within this article are available in all regions).
- Check patient details
- Medical History
- Oral Health Survey
- Terms and Conditions
- Contact Consent
- Patient Data Use
- FP17PR
- Health Screening Form
Check patient details
The interval of how often patients details can be set by adjusting the number of months in the Check patient details every field.
| Note: When set to "0" EXACT will not request the patient details. If any other Patient Portal form is being requested however, the Patient Details form is automatically prompted in case the patient has any details they need to update. |
Medical History
Select the Medical History button to open the configuration window.
| Note: If your practice is collecting information from a Custom Medical History form or an Advanced form and a different form version is selected ALL patients will be required to complete a new medical history form as the data is not transferrable between forms. |
Once open you have several options available, Custom Medical History forms can be created and Clinipad has the option for less detailed forms. This is also where you will find the option to Request new medical histories for all patients.
| Note: Patient Portal can only utilise the Advanced form listed in Fixed Medical History. |
There are options to signal an alert if a medical history is overdue and individual options per Provider.
Oral Health Survey
Clinipad and Patient Portal
Select the Oral Health Survey button to open the configuration window. Once opened you can enable the survey by checking the box or disable by removing the tick. In this window you can edit how often these surveys should be sent, how old a patient should be to be sent a survey as well as if it should be sent for appointments with Dentists or all Providers.
Oral Health Questions
The questions presented to a patient when using a Clinipad can be edited by selecting the Select questions button in the Oral Health Surveys Configuration window.
To add a question, place a tick in box by clicking the box, remove the tick from the box to remove the question.
| Note: Patient Portal does not allow the option to edit the questions on the survey. This is due to the questionnaire being sent via the Patient Portal platform. |
Terms and Conditions
To enable, disable or edit the terms and conditions, navigate to the Terms and Conditions tab.
Check the box to enable or remove the tick to disable.
Select the patients who should receive the terms and conditions via the circle options;
New Patients only Previous Terms and Conditions documents were collected on paper
Use this if you have been routinely collecting terms and conditions from patients.
The arrivals process will only state that the document needs to be collected for new patients.
Patients with no Terms and Conditions document on file
Use this option if you are going to start collecting terms and conditions from patients but have not done so already or if you are starting to collect them in EXACT using new forms.
All patients without a record of terms and conditions stored in EXACT will be asked to sign a copy.
Patients who haven’t signed since Terms and Conditions last changed on [Date]
Use this option if you are updating the practice terms and conditions in EXACT but have been collecting them already. Ensure you enter a date to start requesting new terms and conditions from.
All patients without a record of the new terms and conditions stored in EXACT from this date will be asked to sign a copy.
Enter your practice terms and condition in the Edit Terms and Conditions.
Contact Consent
Default contact to send marketing text is available for use, to enable, disable or edit the contact consent text, navigate to the Contact Consent tab.
Check the box to enable or remove the tick to disable. To edit, type the desired text in the available window. Once edited and saved (OK) this will be sent to patients from that moment forward, any forms already sent will not be changed.
| Tip: Copy the text into a document outside of EXACT to edit a copy in case of making a mistake. |
|
Note: If a patient wishes to opt out of receiving contact consent forms, they must manually request this to the practice. Action this via Contact Preference - Preferences on a patient file, selecting the cross to opt the patient out from marketing. Ensure your company guidelines are followed regarding Marketing Preferences. |
| Tip: If a patient never requests to be removed from marketing consent or does not accept the conditions, the contact consent form will be requested until they do. |
Patient Data Use (Clinipad)
A default disclaimer is available for use with the Clinipad, to enable, disable or edit the patient data use, navigate to the Patient Data Use tab.
Check the box to enable or remove the tick to disable. To edit, type the desired text in the available window. Once edited and saved (OK) this will be sent to patients from that moment forward, any forms already sent will not be changed.
| Tip: Copy the text into a document outside of EXACT to edit a copy in case of making a mistake. |
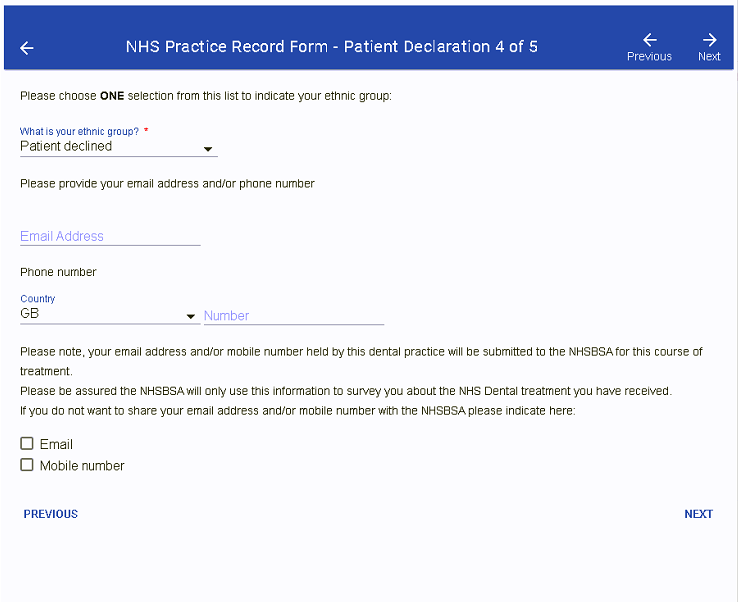
FP17PR (UK only)
To configure how FP17 forms are requested, navigate to the FP17PR drop down menu.
A dropdown menu provides options to choose when an FP17PR or FP17PRW should be requested for your patients.
| Note: If a patient has an existing open NHS course of treatment then the FP17PR form will not be automatically requested via the Arrival Screen, Clinipad or Patient Portal. |
As of August 2022 NHS requires patients to opt out of sending patient details, email and/or SMS, this option is available in the FP17 form, the image below shows the check boxes when completing the form via Patient Portal.
Comments
0 comments
Please sign in to leave a comment.