Working with calibration within Examine Pro

First of all, there are 3 different steps for calibration:
- Calibration info via the module coming from the device
- Calibration info from the calibration table
- Calibration info for a single image
Calibration info via the module coming from the device
When taking an image within Examine Pro, depending on the Xray module, it is possible that the module will automatically detect the calibration. This is only possible if this information is available via the driver or SDK. With some modules, this will not be possible.
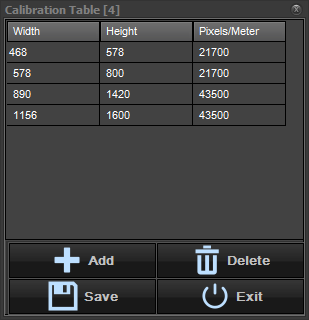
Calibration info from the calibration table.
If there is no calibration info available from the device, Examine Pro will check the calibration table. The calibration table contains a list of fixed image sizes and the corresponding calibration value (pixels/meter). For example, a picture with a width of 468 and a height of 578 will be calibrated as 21700 pixels/meter.

The values in this table can be adapted. (this will be explained later in this document).
Calibration info for a single image
If the image isn’t calibrated by the device or by the calibration table, you can calibrate a single image yourself.
Calibrating a single image
To calibrate a single image, please use the following procedure:
Take an image with the device or import the image into the image library of Examine Pro.
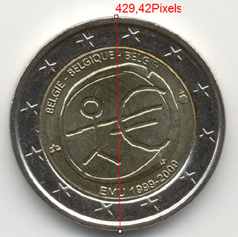
Use an object you know the measurement of, for example a paperclip or a coin
Open the image in a viewport.
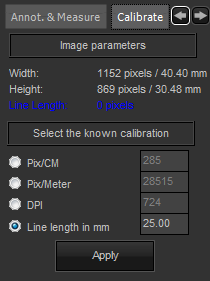
Click on the Annotation Button 
Select the Measure tab
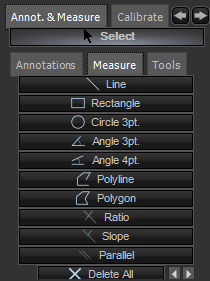
Select the Line tool and draw a line on the image (the length of the line is in pixels, this is an indication that the image is not calibrated).
Choose the Calibrate tab (you will find it next to the Implants tab – if available).
Fill in the real length/size of the object.

Click Apply and you will see the size will turn into mm (you may need to click on the line for the value to update to mm).
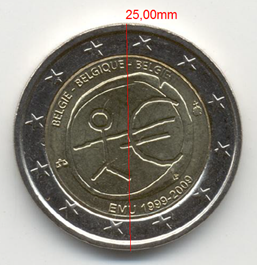
Now this single image is calibrated and you can use the calibration value to measure additional things.
When you know you will use more images from the same device or you will import more images from the same origin, you can setup the calibration value into the calibration table. Depending on the image size you can define the calibration value, so images with the same size will use the same calibration value.
Configuring the calibration table
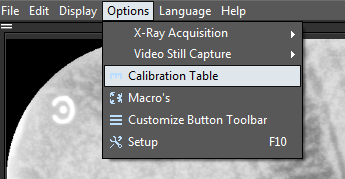
Go to Options in the Examine Pro menu, and click on Calibration table.
The calibration table will be shown.
Click on the Add button.
Fill in the values you can see in the calibrate tab of the annotations window.
Click on the Save button and then the Exit button.

- As a result images imported with the size 600x600 pixels, will be automatically calibrated with 17177 pixels/meter.
Important note: The values used in this example are fictitious and cannot be used on real-life examples of images. They are used to show the functionality in Examine Pro.
Comments
0 comments
Please sign in to leave a comment.