Viewing Images/X-rays on the Chart
The "Images on Chart" feature gives a dentist close integration between the chart and any images stored in EXAMINE Pro. You will instantly be able to see whether there are any images stored for a tooth, and to access them with one click.
The "Images on Chart" feature works only with 2D mode - it is not operational in 3D mode.
If two monitors are connected to the computer, the Image Viewer and Cascade Viewer features (details below) will not launch unless EXACT is running on the primary monitor.
EXAMINE Pro Show Hidden checkbox
When the software has the setting Hide images instead of delete checked, then when an image is "deleted" in EXACT it is actually hidden.

the Images tab now includes a Show Hidden checkbox that is unchecked by default (hidden images do not display). Check this checkbox to display the "deleted" images, together with the active images.

When you click the Chart tab for a patient, EXAMINE Pro starts and any images for that patient load.
Any teeth that have images associated with them will have a bar next to their graphic on the tooth chart.
Hover your mouse cursor over the tooth to display a tooltip listing the images:

To view the images
-
Hover the mouse over the bar next to the tooth - the most recent image will appear. It will disappear once the mouse cursor is moved off the bar.
OR -
Right-click the the bar next to the tooth; the Image menu will be displayed, offering you the choice of launching EXAMINE Pro, the Image Viewer or the Cascade Viewer:

-
In the Images window, select the appropriate tooth, then click either the Image Viewer button

-
or the Cascade Viewer button

Configuring Images on Chart
Images to be used for viewing on the chart are classified into four types:
-
X-rays
-
Panoral (OPG)
-
Photos
-
Other
The ConfigureEXAMINE Pro configuration screen allows you to set up and classify the sites image types into these groups.
Access the screen from the Configure menu in EXACT.

The above example has some entries deliberately left blank as they do not relate to teeth, being extra-oral or other x-ray types. You may override these default settings or add more if you wish.
The list of types defaults to include all the types available in EXAMINE Pro when the software is first run. After that it is up to the user to keep track of any changes.
This is a simple list window where you can create and edit text entries. For each text entry you can choose one of the four types.
If no type is chosen, then the image type will not be shown on the chart representation.
Adding or Editing images
-
To add items to the list, click the +1 button, and then browse your computer to find the image file(s) you wish to add.
-
To edit list items, either double-click the item in the list, or highlight it and click the ED (edit) button to display an Edit window:

-
Images Type - Each type has up to three subcategories, separated by a semicolon, including:
(Intra-oral), EO (Extra-oral), NA (Not Applicable).
XRAY, PAN (Panoral), CEPH (Cephalometric ), TWN (Twain acquisition
IO - Bitewing, Periapical, StillCam (still camera image), StreamCam (streaming camera image), Other.
As above. Click the down button to select from the drop-down list:

Click the OK button to save the changes made, or the Cancel button to close the window without saving any changes.
Image Representation
Colour Coding:
Image indicators are shown onscreen, as coloured bars above and below the teeth, to show there are images present.
-
X-rays are indicated by red bars
-
Photos are indicated by blue bars
-
'Other' images are indicated by green bars
-
Panorals are indicated by a red bar through the centre of the chart (between upper and lower teeth).
Image Age:
To differentiate images on the basis of age, the older they get, the paler the coloured indicator bars will become, allowing the dentist to see at a glance how old (and therefore how relevant) an image is.
-
Indicators for images 0-1 year old will be shown normal colour red, green or blue:

-
Images 1-2 years old will be represented like this:

-
Images 2-3 years old will be represented like this:

-
Images 3-4 years old will be represented like this:

-
Images four years and older will be indicated only by a border of light grey:

Indicator bar location for Bitewing and Panoral

Where the tooth range covers both jaws (a bitewing) it is represented as a single bar between the rows of teeth spanned. A panoral image is located centrally.
Where there are multiple images for a tooth, the bars will be drawn from oldest to newest, so that the newest, most relevant images are shown on top.
Indicator bars are drawn so that they span the teeth that the image belongs to; e.g. an image covering teeth LL5 to LL8 will be drawn as a single rectangle alongside LL5 through LL8 on the chart.
An image indicator is displayed only if the teeth it covers are on the chart; e.g. deciduous tooth x-rays are not drawn unless the deciduous teeth are being displayed. Where mixed dentition is being displayed, then the image indicators for the deciduous and permanent teeth are shown in the same place, as this is most likely to be the case, as in a retained deciduous tooth alongside the permanent tooth. For example, an indicator bar for an x-ray for UL5 would be drawn at the same location as one for ULE.
Example:

In the example above, there are the following images associated with the chart:
-
A recent (less than 1 year old) panoral x-ray image (red centre).
-
Recent images of type Other at UR8-LR6 (a bitewing), at UR6-UR4, and at LL6.
-
An older image (3 to 4 years old) at UL4 to UL6.
Image Controls
The image representations also function as shortcuts to the images. If you hover the mouse cursor over the representative rectangle, a tooltip will be displayed of the most recent image of the types being shown (excluding filtered images) for the tooth.

The tooltip will be the same as if you had found the image in the images tab list and hovered the mouse there. This will allow you to review the most recent image for a tooth.
If you click on the rectangle with the left mouse button, the Image Viewer will be launched, with images for that tooth.
If you click on the rectangle with the right mouse button, the Cascade Viewer will be launched.
The Image Viewer can be invoked in three ways:
-
By clicking once on an image indicator bar on the tooth chart. This will show only those images for the tooth or teeth the bar is associated with.
If you hover your mouse cursor over the image indicator bar on the tooth chart, a preview 'tooltip' of the image is displayed.
If you right-click the image indicator bar, the image(s) will be displayed instead via the Cascade Viewer.
-
By clicking the Image Viewer button
 on the "Images" tab of the Chart window.
 -
By double-clicking an image on the "Images" tab, (or right-clicking an image and selecting "Image Viewer" from the drop-down menu).
Both of the two previous options will display all images for the current patient.
Once invoked, the Image Viewer 'floats' on top of all other open windows until closed by clicking the 
button. Every time you invoke the Image Viewer, it will open another floating window in the same position as the last one displayed. If you haven't moved previous Image Viewer windows, they will stack up one on top of another.
You can also temporarily remove an Image Viewer window from the screen (minimise it) by clicking the 'Minimise' button:

This will initially place the minimised window

at the bottom left of the screen, and any other minimised Image Viewer windows will be placed adjacent to it. However, once you move a minimised window by dragging it with the mouse, if it is subsequently opened then minimised again, it will return to where it was on the screen when last minimised.
To Move a window:
-
Click the left mouse button anywhere inside the header bar.
-
While holding the button down, move the mouse up, down and/or sideways until the Image Viewer window is in the required place.
-
Release the mouse button; the window will stay in this position until you move it again or close it.
To Resize the Image Viewer window:
Image Viewer windows are never opened in full-screen mode. When no Image Viewer windows are open, the window size stored as the default is that of the very last window that was closed. This then becomes the default size for any windows opened the next time you open an Image Viewer session.
However, regardless of the size of a window when you opened it, you can make each window whatever size you wish, up to full-screen size.
-
You can make the Image Viewer full-sized (maximise it) by clicking the Maximise button:

-
When maximised, you can return the Image Viewer to 'normal' size by clicking the button again:

To make the Image Viewer any size between the 'normal' size and maximised size:
-
Hover the mouse cursor over the edge of the window until it turns into a double-headed arrow:
 (To move two adjacent sides together, hover the mouse cursor over a corner of the window).
 -
While holding the button down, move the mouse up, down and/or sideways as appropriate until the Image Viewer window is the required size.
Release the mouse button; the window will stay this size until you resize it.
Note that subsequently opened windows will always initially be the old size, as the default settings of new windows are not reset until the very last window is closed. At this point, that window's size is stored and becomes the new default window size.
Features

|
Header Bar |
Shows the tooth (or teeth) the images are associated with. In the example, this is LL6. |
|
Upper pane |
The top part of the window shows small 'thumbnail' representations of the images.
to scroll between multiple images. |
|
Information |
Below the thumbnail image(s) there are two lines of information about the currently selected image. The first line of information is the file name, and the image details: date and time created and any other information saved against the image, such as tooth number. To view the full line of information, enlarge the window or click the edit button Both the upper and lower panes can have more than one image displayed, and each can have a different image selected (as indicated by being highlighted with a red border). The detail in the information panel always pertains to the image selected in the lower pane. |
|
Lower pane |
The lower part of the window shows each image in a larger version. The size of the image is initially scaled to fit the size of the lower pane, but can be 'zoomed' to another size (see "Size" below). If you wish to, you can display the same image several times in the lower pane, then manipulate each image separately and independently. |
|
Image Manipulation The features below describe various ways you can manipulate the image(s) displayed. None of these permanently alter the stored image (changes are lost once another image is selected). |
|
|
Number of Images |
If there is more than one image available, you can scroll the images by using the
The three buttons on the middle section control whether the lower pane displays one, two or four image viewports: Click the appropriate button; this will display 1, 2 or 4 viewports. Click the viewport the image is to be displayed in. Select the image in the upper pane that is to be displayed in the currently selected lower viewport. |
|
Size |
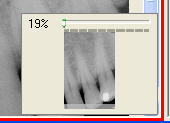
There is a slider control in the bottom right-hand corner of the viewport for the currently selected image:
This shows a thumbnail picture of the current image, and what size the image is set to, relative to the original image (in this example, 19%). |
|
Pan |
If the image size is larger than will fit in the viewport, scroll bars are displayed to enable you to move the image vertically and/or horizontally. You can also drag the image with your mouse, or click with the middle mouse button or wheel: this will display a four-headed arrow - move your mouse around this and the image will move in that direction. |
|
Brightness |
Right-click anywhere on the image and while holding the right button down, move the mouse to the right to make the image brighter, or to the left to make it darker. |
|
Contrast |
Right-click anywhere on the image and while holding the right button down, move the mouse up to increase contrast, or down to decrease contrast. |
|
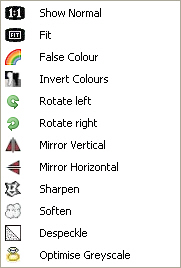
Image Toolbox |
Select an image and click the |
|
|
Show Normal: Shows the selected image at original size. Fit: Resizes the image to fit the current viewport size. False Colour: Applies a preset false colour to the image. Click the button again to return the image to normal colouration. Invert Colours: Inverts the current display colour. Click the button again to undo the colour inversion. Rotate left/right: Each click of one of these buttons will rotate the image through 90 degrees anticlockwise/clockwise as appropriate. Mirror Vertical/Horizontal: Shows a mirror image of the original, as if reflected in the horizontal or vertical axis. Sharpen: Makes the image appear sharper by emphasising the difference between adjacent spots on the image. Soften: Makes the image appear softer by blurring the distinction between adjacent spots on the image. Despeckle: Makes an image look less 'speckled' by merging small dots on the image with adjacent (background) parts of the image. Optimise Greyscale: Click this button once to optimise the contrast and brightness for black and white images such as x-rays. |
Cascade Viewer
The Cascade Viewer is available to EXACT users who have EXAMINE Pro registered, and have configured it to be used.
To invoke the Cascade Viewer Either
-
Right-click an image indicator bar on the tooth chart, and select Cascade Viewer from the drop-down menu.
This will show only those images for the tooth or teeth with which the bar is associated. -
Click the Cascade button
 on the Images tab of the Chart window to display all images for the current patient.
Due to potential image quality problems where two monitors are connected to one computer, the Cascade Viewer feature (details below) will not launch unless EXACT is running on the primary monitor. The images will appear only on the primary monitor.
Using the Cascade Viewer
Once invoked, the Cascade Viewer 'floats' on top of all other open windows, and will be displayed until you close it.
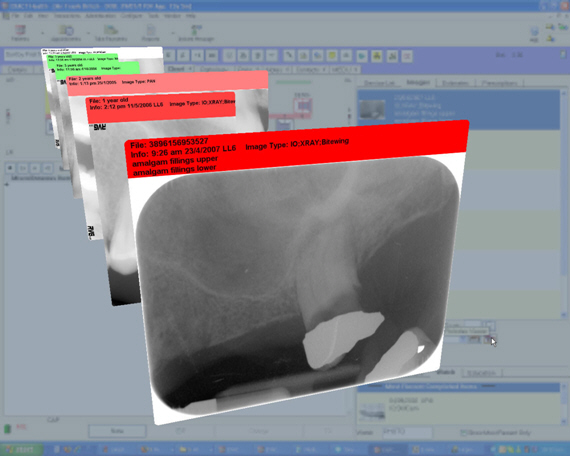
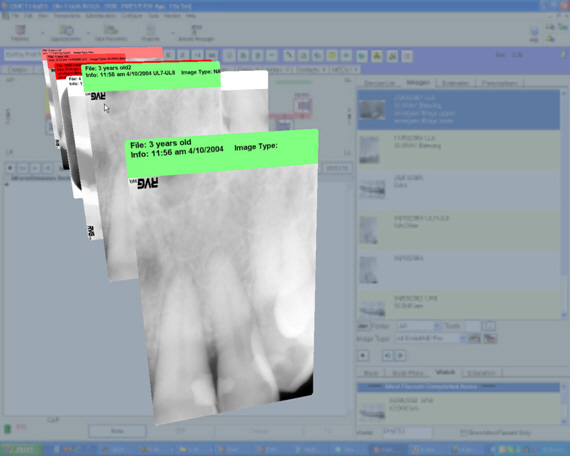
The images are displayed in an arc and flip forward toward you, just like the cards in a flip-card file:

While you are viewing the images in this fashion, the background is inactive and the resolution is reduced in favour of the images you are viewing.
Scrolling: You can scroll the images forward or backwards using the up/down arrows on the keyboard, or the scroll button on your mouse (if so equipped).
Choose an Image: Hover your mouse cursor over an image - it will 'pop up' out of the other images, like the second green-tabbed image below, so you can read the details on the tab:

Close Cascade: Press the ESC button on your keyboard or click anywhere on the screen away from the Cascade images.


 button, or right-click an image, and the following menu is displayed, to enable you to manipulate the selected image:
Comments
0 comments
Please sign in to leave a comment.